Spring Security Notes
Introduction
These notes for the lesson will first cover practical operations, then principles.
Overview
Spring Security is a security management framework within the Spring ecosystem. Generally, medium to large projects use Spring Security, while smaller projects use Shiro. Most web applications need to implement authentication and authorization.
Authentication: Verifies if the current system user is a valid user and identifies which user it is. Authorization: After authentication, determines if the current user has permission to perform a certain operation.
Authentication and authorization are the core functionalities of Spring Security as a security framework.
Quick Start
Preparation
Create a basic web project (refer to Springboot notes for details)
Create the project
Create the startup class
Create a Controller with path
/hello
Import Spring Security
   <dependency>
      <groupId>org.springframework.boot</groupId>
      <artifactId>spring-boot-starter-security</artifactId>
   </dependency>
At this point, when you restart the Application and try to access /hello, you'll find that you can't access it directly. Instead, you'll be redirected to /login, requiring you to log in first. This is the login interface already encapsulated by Spring Security; you must obtain permission before accessing the corresponding web page.
The default test account username is "user", and the password will be generated in the backend console.
By default, you must log in before accessing any interface.
Authentication
Login Verification Process
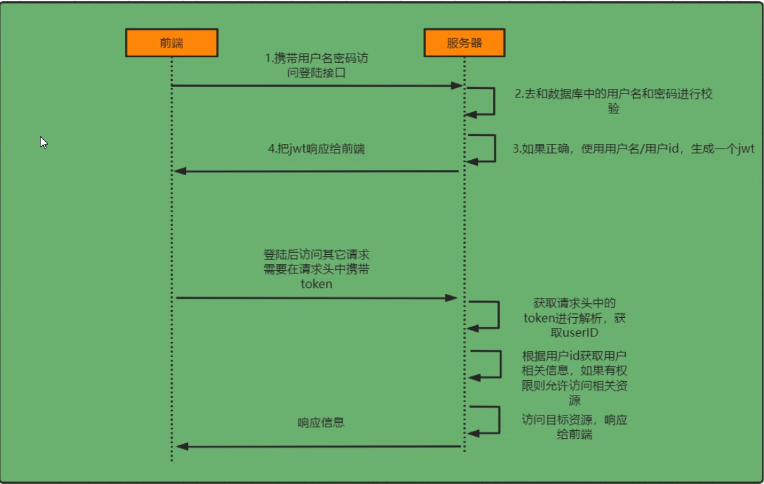
The core principle is that during the first login:
The entry-level case might differ slightly from the above. The default case strategy is based on Session.
The server finds the user
Generates a token based on the user
Returns the token
The frontend carries the token for subsequent access
The server receives and verifies the token
After successful verification, it checks relevant permissions and allows access if permitted, otherwise forbidden
If successful, accesses the resource and returns it to the frontend
Some Principles
Complete Spring Security Process
Spring Security is essentially a filter chain, containing filters that provide various functionalities.
The image only shows core filters; non-core filters are hidden.
Recall: Filters execute before interceptors
UsernamePasswordAuthenticationFilter is responsible for handling login requests after username and password are filled in the login page.ExceptionTranslationFilter: Handles any AccessDeniedException and AuthenticationException thrown in the filter chain.FilterSecurityInterceptor: The filter responsible for permission checks. Although named as an interceptor, it implements the filter interface in the source code. The first two are responsible for authentication, while the last one is responsible for authorization.
Entry-level Case Authentication Process
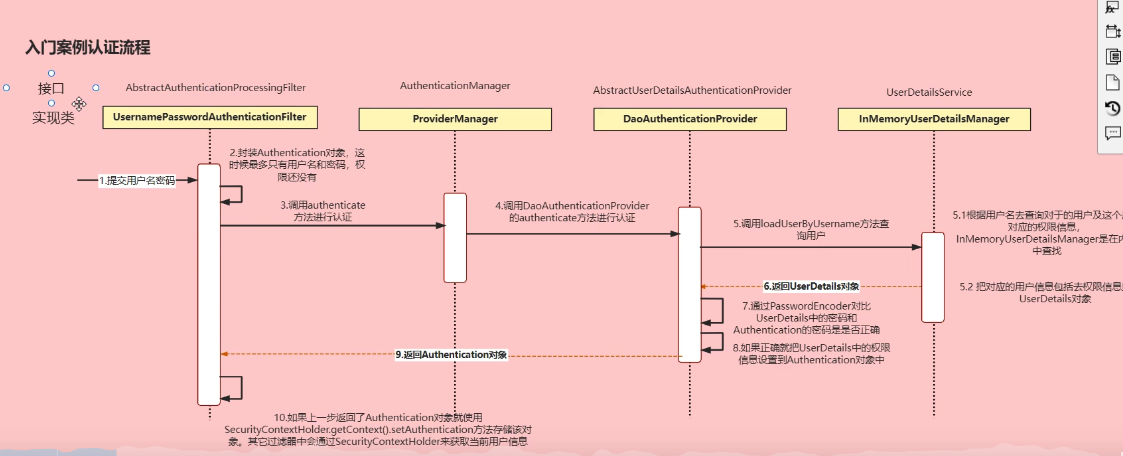
Authentication interface: Its implementation class represents the current user accessing the system, encapsulating user-related information. AuthenticationManager interface: Defines the method for authenticating Authentication. UserDetailsService interface: Core interface for loading user-specific data, defining a method to query user information based on username (needs to be implemented later through Repo). UserDetails interface: Provides core user information. The user information obtained through UserDetailsService based on the username should be encapsulated into a UserDetail object and returned, then this information is encapsulated into the Authentication object.
Authentication process:
Frontend sends username and password
Encapsulate into an Authentication object, initially containing only username and password
Pass the Authentication object for authentication, calling the authenticate method
In the authentication method, it will call the DAO's auth method for authentication, continuing to pass the Authentication object
Based on the username in the Authentication object, call the loadUserByUsername method of UserDetailsService to get the object from the database (in the diagram, it's retrieved from memory, but in practice, it will be from the database)
Encapsulate the information obtained from the database, including permission information, into a UserDetails object
Let the password in the Authentication object -> through PasswordEncoder -> become a hash-encrypted password and compare it with the password in the UserDetails object to check if it's correct (passwords in the database are all encrypted)
If correct, set the UserDetails information to the Authentication object and return the Authentication object
Finally, when exiting the current Filter, store the current Authentication object in SecurityContextHolder for subsequent filter calls, such as FilterSecurityInterceptor, which needs to be based on current user information when checking permissions
How to Modify It to Fit Our Needs
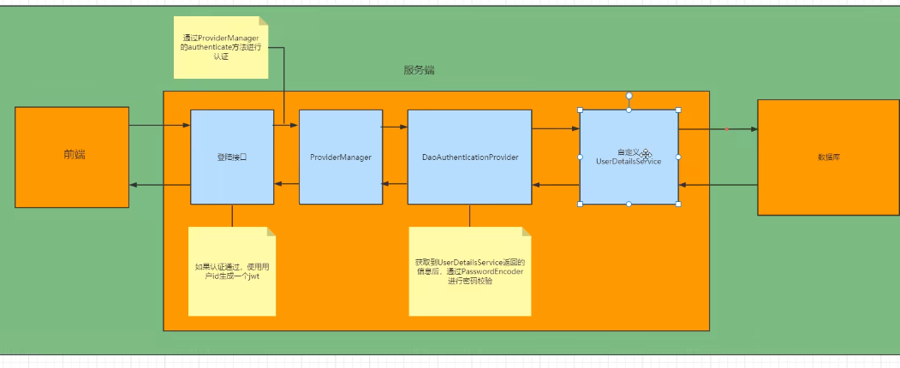
We definitely can't use the default UserDetailsService; we need to get information from our database.
When the information is returned to the Filter, we can't generate a token, so we need to replace this layer of Filter in our own Controller, then call the second layer in the controller.
How to Verify Subsequently
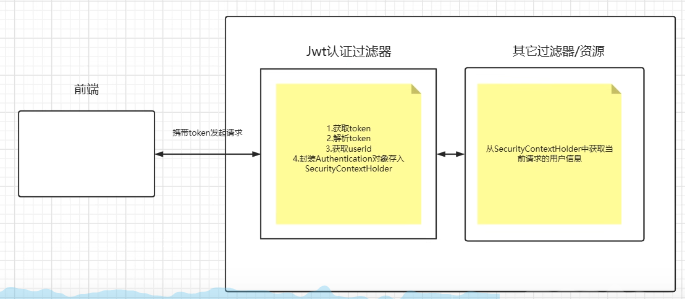
But how do we get complete user information later? If we want to get user permissions, do we need to search the database again?
So we can use Redis cache or use ThreadLocal (not suitable for clusters) to reduce database pressure.
When authentication passes and JWT is generated, use userId as the key and user information as the value, and store it in Redis.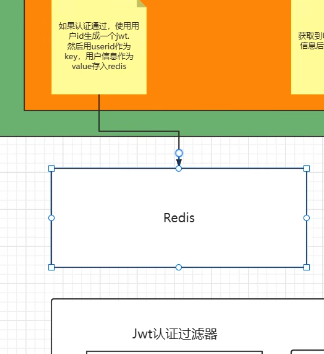
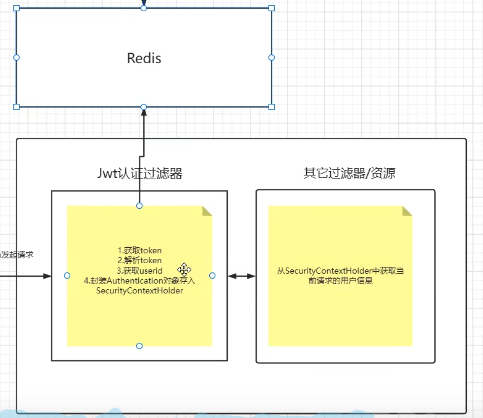
Thought Summary
Login
Customize login interface controller, call ProviderManager's method for authentication, generate JWT after authentication passes, store user information in Redis
Customize UserDetailsService Verification
Define JWT authentication filter
Get token
Parse token
Get userId
Encapsulate Authentication object and store it in SecurityContextHolder for subsequent filter calls and verification
Solution Process
Add Redis, fastjson, and JWT-related dependencies.
If you need to add accounts and passwords directly to the database, if the password is plaintext, you need to add the {noop} prefix. But in general development now, we won't use this method of strategy generated by the default PasswordEncoderFactory.
Now we all use BCryptPasswordEncoder provided by Spring Security. We only need to inject the BCryptPasswordEncoder object, and Spring Security will automatically use this object for password verification.
Implement UserDetailsService to achieve getting users from our own database.
Then implement a custom login interface, rewrite verification, generate JWT after successful verification, and store user information in Redis.
Rewrite the HttpSecurity http method through SecurityConfig to allow access to the custom login interface.
Token Verification Filter
Write a JwtAuthFilter Implement logic:
Get token
Parse token
Get user information from Redis
Store in SecurityContextHolder to prepare for subsequent authorization filter calls
Allow passage Place this filter before UserPasswordAuthFilter, so we need to modify the relevant configuration in SecurityConfig.
http.addFilterBefore(jwtAuthenticationFilter,UsernamePasswordAuthenticationFilter.class);
Logout
Define a logout interface, directly get the current user's information from SecurityContextHolder, and then delete it from Redis.
Authorization
The purpose of authorization is to allow different users to use different functions. In Spring Security, the default FilterSecurityInterceptor will be used for verification. In FilterSecurityInterceptor, it will use SecurityContextHolder to get the Authentication in it, then get the user's permission information, and then check if the current user has the information needed to access the current resource.
Spring Security provides us with an annotation-based permission control solution, which is also my preferred permission control solution, assigning permissions by adding annotations to specific routes.
First, enable the annotation method through @EnableGlobalMethodSecurity(prePostEnabled = true) to achieve pre-authorization when writing routes.
Then add the @PreAuthorize annotation to the method to mark permissions. Later, we can self-encapsulate based on PreAuthorize.
Similarly, we need to encapsulate permissions into the Authentication object when logging in for the first time. The actual permissions can be stored anywhere. If we just think about it, the chosen solution is to store permissions in the object, and then implement OneToMany. It's similar to this: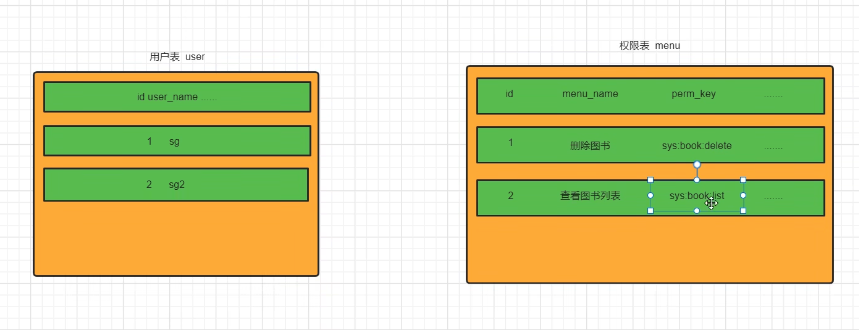
Right? But if there are too many users, and one user corresponds to multiple permissions, it will actually make the table explode.
So what we hope is that when a user registers, we can configure a set of permission information for them at once.
So we introduce the concept of a role, which actually represents a collection of a set of permission information.
So here's a solution called
RBAC Permission Model,
Role-Based Access Control, which is currently the most used and most common among developers.
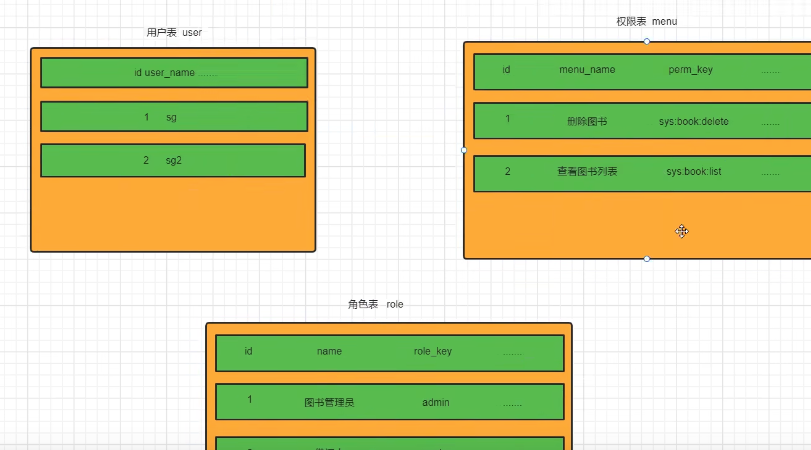
Similarly, it can be understood that we use roles to:
Prevent users from directly making a one-to-many relationship with the permission table
Compress the user's one-to-many table through roles (idea). At this time, users can obtain overlap permissions by obtaining roles. So adding the above three tables and two id tables, 5 tables in total. I can do it easily, haha.
Then perform multi-table queries based on this.
Custom Failure Handling
We also hope that when authentication fails or authorization fails, it can return JSON with the same structure as our interface, rather than directly throwing an Exception in the backend. This way, we can unify the interface with the frontend.
According to the above flow chart, in Spring Security, if an exception occurs during our authentication or authorization process, it will be caught by ExceptionTranslationFilter. In ExceptionTranslationFilter, it will judge whether the exception occurred in authentication or authorization.
If it's an authentication process exception: it will encapsulate AuthenticationException and then call the AuthenticationEntryPoint object method for exception handling.
If it's an authorization process exception: it will encapsulate AccessDeniedException and then call AccessDeniedHandler for exception handling.
So if we need to customize this part of the handling, we only need to customize AuthenticationEntryPoint and AccessDeniedHandler objects and then configure them to Spring Security.
Cross-Origin Resource Sharing (CORS)
For security reasons, browsers require that HTTP requests initiated using XMLHttpRequest must comply with the same-origin policy, otherwise, they are cross-origin HTTP requests, which are forbidden by default. The same-origin policy requires that the source be the same for normal communication, meaning the protocol, domain name, and port must be completely identical.
In front-end and back-end separated projects, the front-end and back-end are generally of different origins, so there will definitely be cross-origin request issues.
There are several solutions: The first is nginx Deploy the front-end under Nginx, with Nginx acting as a proxy for calling back-end services. This way, all requests from the front-end are directly pointed to the Nginx address, and Nginx specifically requests the back-end services. This way, for the front-end, all its requests are initiated under its own domain, so there's no cross-origin problem.
The second is CORS Cross-Origin Resource Sharing CORS requires support from both the browser and the server. Currently, all browsers support this feature, IE browsers cannot be lower than IE10. Taking Java as an example, you only need to add the corresponding information to the header of the Response. CORS defines a way for client Web applications loaded in one domain to interact with resources from a different domain.
Custom Permission Verification
In actual development, we can't possibly only use the hasAuthority provided by Spring Security. We will customize permission verification based on this -> use our own methods in the PreAuthorize annotation.
CSRF (Cross-Site Request Forgery)
We've seen this term before in the configuration:
Actually, CSRF is a web attack method. In the configuration, this turns off the strategy to prevent this type of attack.
Spring Security's method of prevention is to generate a csrf_token. The backend needs to generate this token, and the frontend needs to carry this token when making requests. The backend will have a filter to verify, and if it's not carried, it's considered fake and access is not allowed.
CSRF attacks rely on the authentication information carried in cookies, but in front-end and back-end separated projects, we don't use cookies, and the token is not 21stored in cookies. So we don't need this, and we execute by putting the token in the request header through front-end code.
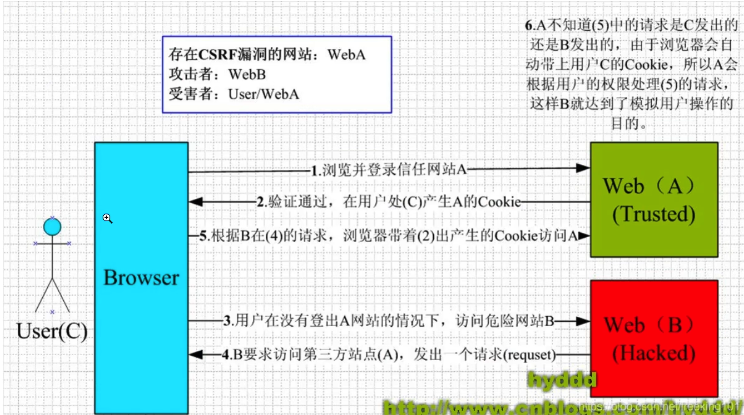
So why can it prevent? We usually put the token in localStorage, and web B cannot cross-domain read web A's localStorage.
Last updated